lsof 简介

4:18:00 PM 0 Comments


lsof(list open files)是一个列出当前系统打开文件的工具。在linux环境下,任何事物都以文件的形式存在,通过文件不仅仅可以访问常规数据,还可以访问网络连接和硬件。所以如传输控制协议 (TCP) 和用户数据报协议 (UDP) 套接字等,系统在后台都为该应用程序分配了一个文件描述符,无论这个文件的本质如何,该文件描述符为应用程序与基础操作系统之间的交互提供了通用接口。因为应用程序打开文件的描述符列表提供了大量关于这个应用程序本身的信息,因此通过lsof工具能够查看这个列表对系统监测以及排错将是很有帮助的。


lsof使用
 

lsof输出信息含义

在终端下输入lsof即可显示系统打开的文件,因为 lsof 需要访问核心内存和各种文件,所以必须以 root 用户的身份运行它才能够充分地发挥其功能。


COMMAND PID USER FD TYPE DEVICE SIZE NODE NAME
init 1 root cwd DIR 3,3 1024 2 /
init 1 root rtd DIR 3,3 1024 2 /
init 1 root txt REG 3,3 38432 1763452 /sbin/init
init 1 root mem REG 3,3 106114 1091620 /lib/libdl-2.6.so
init 1 root mem REG 3,3 7560696 1091614 /lib/libc-2.6.so
init 1 root mem REG 3,3 79460 1091669 /lib/libselinux.so.1
init 1 root mem REG 3,3 223280 1091668 /lib/libsepol.so.1
init 1 root mem REG 3,3 564136 1091607 /lib/ld-2.6.so
init 1 root 10u FIFO 0,15 1309 /dev/initctl


每行显示一个打开的文件,若不指定条件默认将显示所有进程打开的所有文件。lsof输出各列信息的意义如下:

COMMAND:进程的名称
PID:进程标识符
USER:进程所有者
FD:文件描述符,应用程序通过文件描述符识别该文件。如cwd、txt等
TYPE:文件类型,如DIR、REG等
DEVICE:指定磁盘的名称
SIZE:文件的大小
NODE:索引节点(文件在磁盘上的标识)
NAME:打开文件的确切名称


其中FD 列中的文件描述符cwd 值表示应用程序的当前工作目录,这是该应用程序启动的目录,除非它本身对这个目录进行更改。
txt 类型的文件是程序代码,如应用程序二进制文件本身或共享库,如上列表中显示的 /sbin/init 程序。其次数值表示应用
程序的文件描述符,这是打开该文件时返回的一个整数。如上的最后一行文件/dev/initctl,其文件描述符为 10。u 表示该
文件被打开并处于读取/写入模式,而不是只读 ® 或只写 (w) 模式。同时还有大写 的W 表示该应用程序具有对整个文件的写
锁。该文件描述符用于确保每次只能打开一个应用程序实例。初始打开每个应用程序时,都具有三个文件描述符,从 0 到 2,
分别表示标准输入、输出和错误流。所以大多数应用程序所打开的文件的 FD 都是从 3 开始。
与 FD 列相比,Type 列则比较直观。文件和目录分别称为 REG 和 DIR。而CHR 和 BLK,分别表示字符和块设备;
或者 UNIX、FIFO 和 IPv4,分别表示 UNIX 域套接字、先进先出 (FIFO) 队列和网际协议 (IP) 套接字。

lsof常用参数

lsof 常见的用法是查找应用程序打开的文件的名称和数目。可用于查找出某个特定应用程序将日志数据记录到何处,或者正在跟踪某个问题。
例如,linux限制了进程能够打开文件的数目。通常这个数值很大,所以不会产生问题,并且在需要时,应用程序可以请求更大的值(直到某
个上限)。如果你怀疑应用程序耗尽了文件描述符,那么可以使用 lsof 统计打开的文件数目,以进行验证。lsof语法格式是:


lsof [options] filename


常用的参数列表:

lsof filename 显示打开指定文件的所有进程
lsof -a 表示两个参数都必须满足时才显示结果
lsof -c string 显示COMMAND列中包含指定字符的进程所有打开的文件
lsof -u username 显示所属user进程打开的文件
lsof -g gid 显示归属gid的进程情况
lsof +d /DIR/ 显示目录下被进程打开的文件
lsof +D /DIR/ 同上,但是会搜索目录下的所有目录,时间相对较长
lsof -d FD 显示指定文件描述符的进程
lsof -n 不将IP转换为hostname,缺省是不加上-n参数
lsof -i 用以显示符合条件的进程情况
lsof -i[46] [protocol][@hostname|hostaddr][:service|port]
46 --> IPv4 or IPv6
protocol --> TCP or UDP
hostname --> Internet host name
hostaddr --> IPv4地址
service --> /etc/service中的 service name (可以不只一个)
port --> 端口号 (可以不只一个)


例如: 查看22端口现在运行的情况

# lsof -i :22
COMMAND PID USER FD TYPE DEVICE SIZE NODE NAME
sshd 1409 root 3u IPv6 5678 TCP *:ssh (LISTEN)


查看所属root用户进程所打开的文件类型为txt的文件:

# lsof -a -u root -d txt
COMMAND PID USER FD TYPE DEVICE SIZE NODE NAME
init 1 root txt REG 3,3 38432 1763452 /sbin/init
mingetty 1632 root txt REG 3,3 14366 1763337 /sbin/mingetty
mingetty 1633 root txt REG 3,3 14366 1763337 /sbin/mingetty
mingetty 1634 root txt REG 3,3 14366 1763337 /sbin/mingetty
mingetty 1635 root txt REG 3,3 14366 1763337 /sbin/mingetty
mingetty 1636 root txt REG 3,3 14366 1763337 /sbin/mingetty
mingetty 1637 root txt REG 3,3 14366 1763337 /sbin/mingetty
kdm 1638 root txt REG 3,3 132548 1428194 /usr/bin/kdm
X 1670 root txt REG 3,3 1716396 1428336 /usr/bin/Xorg
kdm 1671 root txt REG 3,3 132548 1428194 /usr/bin/kdm
startkde 2427 root txt REG 3,3 645408 1544195 /bin/bash
... ...


lsof使用实例
 

一、查找谁在使用文件系统

在卸载文件系统时,如果该文件系统中有任何打开的文件,操作通常将会失败。那么通过lsof可以找出那些进程在使用当前要卸载的文件系统,如下:


# lsof /GTES11/
COMMAND PID USER FD TYPE DEVICE SIZE NODE NAME
bash 4208 root cwd DIR 3,1 4096 2 /GTES11/
vim 4230 root cwd DIR 3,1 4096 2 /GTES11/


在这个示例中,用户root正在其/GTES11目录中进行一些操作。一个 bash是实例正在运行,并且它当前的目录为/GTES11,另一个则显示的是vim正在编辑/GTES11下的文件。要成功地卸载/GTES11,应该在通知用户以确保情况正常之后,中止这些进程。 这个示例说明了应用程序的当前工作目录非常重要,因为它仍保持着文件资源,并且可以防止文件系统被卸载。这就是为什么大部分守护进程(后台进程)将它们的目录更改为根目录、或服务特定的目录(如 sendmail 示例中的 /var/spool/mqueue)的原因,以避免该守护进程阻止卸载不相关的文件系统。

二、恢复删除的文件

当Linux计算机受到入侵时,常见的情况是日志文件被删除,以掩盖攻击者的踪迹。管理错误也可能导致意外删除重要的文件,比如在清理旧日志时,意外地删除了数据库的活动事务日志。有时可以通过lsof来恢复这些文件。

当进程打开了某个文件时,只要该进程保持打开该文件,即使将其删除,它依然存在于磁盘中。这意味着,进程并不知道文件已经被删除,它仍然可以向打开该文件时提供给它的文件描述符进行读取和写入。除了该进程之外,这个文件是不可见的,因为已经删除了其相应的目录索引节点。
在/proc 目录下,其中包含了反映内核和进程树的各种文件。/proc目录挂载的是在内存中所映射的一块区域,所以这些文件和目录并不存在于磁盘中,因此当我们对这些文件进行读取和写入时,实际上是在从内存中获取相关信息。大多数与 lsof 相关的信息都存储于以进程的 PID 命名的目录中,即 /proc/1234 中包含的是 PID 为 1234 的进程的信息。每个进程目录中存在着各种文件,它们可以使得应用程序简单地了解进程的内存空间、文件描述符列表、指向磁盘上的文件的符号链接和其他系统信息。lsof 程序使用该信息和其他关于内核内部状态的信息来产生其输出。所以lsof 可以显示进程的文件描述符和相关的文件名等信息。也就是我们通过访问进程的文件描述符可以找到该文件的相关信息。


当系统中的某个文件被意外地删除了,只要这个时候系统中还有进程正在访问该文件,那么我们就可以通过lsof从/proc目录下恢复该文件的内容。 假如由于误操作将/var/log/messages文件删除掉了,那么这时要将/var/log/messages文件恢复的方法如下:
首先使用lsof来查看当前是否有进程打开/var/logmessages文件,如下:

# lsof |grep /var/log/messages
syslogd 1283 root 2w REG 3,3 5381017 1773647 /var/log/messages (deleted)


从上面的信息可以看到 PID 1283(syslogd)打开文件的文件描述符为 2。同时还可以看到/var/log/messages已经标记被删除了。因此我们可以在 /proc/1283/fd/2 (fd下的每个以数字命名的文件表示进程对应的文件描述符)中查看相应的信息,如下:

# head -n 10 /proc/1283/fd/2
Aug 4 13:50:15 holmes86 syslogd 1.4.1: restart.
Aug 4 13:50:15 holmes86 kernel: klogd 1.4.1, log source = /proc/kmsg started.
Aug 4 13:50:15 holmes86 kernel: Linux version 2.6.22.1-8 (root@everestbuilder.linux-ren.org) (gcc version 4.2.0) #1 SMP Wed Jul 18 11:18:32 EDT 2007
Aug 4 13:50:15 holmes86 kernel: BIOS-provided physical RAM map:
Aug 4 13:50:15 holmes86 kernel: BIOS-e820: 0000000000000000 - 000000000009f000 (usable)
Aug 4 13:50:15 holmes86 kernel: BIOS-e820: 000000000009f000 - 00000000000a0000 (reserved)
Aug 4 13:50:15 holmes86 kernel: BIOS-e820: 0000000000100000 - 000000001f7d3800 (usable)
Aug 4 13:50:15 holmes86 kernel: BIOS-e820: 000000001f7d3800 - 0000000020000000 (reserved)
Aug 4 13:50:15 holmes86 kernel: BIOS-e820: 00000000e0000000 - 00000000f0007000 (reserved)
Aug 4 13:50:15 holmes86 kernel: BIOS-e820: 00000000f0008000 - 00000000f000c000 (reserved)


从上面的信息可以看出,查看 /proc/8663/fd/15 就可以得到所要恢复的数据。如果可以通过文件描述符查看相应的数据,那么就可以使用 I/O 重定向将其复制到文件中,如:

cat /proc/1283/fd/2 > /var/log/messages


对于许多应用程序,尤其是日志文件和数据库,这种恢复删除文件的方法非常有用。

VIM文件编码识别与乱码处理

10:09:00 PM 0 Comments


在 Vim 中, 有四个与编码有关的选项, 它们是: fileencodings、 fileencoding、 encoding 和 termencoding。 在实际使用中, 任何一个选项出现错误, 都会导致出现乱码。 因此, 每一个 Vim 用户都应该明确这四个选项的含义。 下面, 我们详细介绍一下这四个选项的含义和作用。 


1 encoding


encoding 是 Vim 内部使用的字符编码方式。 当我们设置了 encoding 之后, Vim 内部所有的 buffer、 寄存器、 脚本中的字符串等, 全都使用这个编码。 Vim 在工作的时候, 如果编码方式与它的内部编码不一致, 它会先把编码转换成内部编码。 如果工作用的编码中含有无法转换为内部编码的字符, 在这些字符就会丢失。 因此,在选择 Vim 的内部编码的时候, 一定要使用一种表现能力足够强的编码, 以免影响正常工作。


由于 encoding 选项涉及到 Vim 中所有字符的内部表示, 因此只能在 Vim 启动的时候设置一次。 在 Vim 工作过程中修改 encoding 会造成非常多的问题。 如果没有特别的理由, 请始终将 encoding 设置为 utf-8。 为了避免在非 UTF-8 的系统如 Windows 下, 菜单和系统提示出现乱码, 可同时做这几项设置:


set encoding=utf-8


set langmenu=zh_CN.UTF-8


language message zh_CN.UTF-8


2 termencoding


termencoding 是 Vim 用于屏幕显示的编码, 在显示的时候, Vim 会把内部编码转换为屏幕编码, 再用于输出。 内部编码中含有无法转换为屏幕编码的字符时, 该字符会变成问号, 但不会影响对它的编辑操作。 如果 termencoding 没有设置, 则直接使用 encoding 不进行转换。


举个例子, 当你在 Windows 下通过 telnet 登录 Linux 工作站时, 由于 Windows 的 telnet 是 GBK 编码的, 而 Linux 下使用 UTF-8 编码, 你在 telnet 下的 Vim 中就会乱码。 此时有两种消除乱码的方式: 一是把 Vim 的 encoding 改为 gbk, 另一种方法是保持 encoding 为 utf-8, 把 termencoding 改为 gbk, 让 Vim 在显示的时候转码。 显然, 使用前一种方法时, 如果遇到编辑的文件中含有 GBK 无法表示的字符时, 这些字符就会丢失。 但如果使用后一种方法, 虽然由于终端所限, 这些字符无法显示, 但在编辑过程中这些字符是不会丢失的。


对于图形界面下的 GVim, 它的显示不依赖 TERM, 因此 termencoding 对于它没有意义。 在 GTK2 下的 GVim 中, termencoding 永远是 utf-8, 并且不能修改。 而 Windows 下的 GVim 则忽略 termencoding 的存在。


fileencoding


当 Vim 从磁盘上读取文件的时候, 会对文件的编码进行探测。 如果文件的编码方式和 Vim 的内部编码方式不同, Vim 就会对编码进行转换。 转换完毕后, Vim 会将 fileencoding 选项设置为文件的编码。 当 Vim 存盘的时候, 如果 encoding 和 fileencoding 不一样, Vim 就会进行编码转换。 因此, 通过打开文件后设置 fileencoding, 我们可以将文件由一种编码转换为另一种编码。 但是, 由前面的介绍可以看出, fileencoding 是在打开文件的时候, 由 Vim 进行探测后自动设置的。 因此, 如果出现乱码, 我们无法通过在打开文件后重新设置 fileencoding 来纠正乱码。


4 fileencodings


编码的自动识别是通过设置 fileencodings 实现的, 注意是复数形式。 fileencodings 是一个用逗号分隔的列表, 列表中的每一项是一种编码的名称。 当我们打开文件的时候, VIM 按顺序使用 fileencodings 中的编码进行尝试解码, 如果成功的话, 就使用该编码方式进行解码, 并将 fileencoding 设置为这个值, 如果失败的话, 就继续试验下一个编码。


因此, 我们在设置 fileencodings 的时候, 一定要把要求严格的、 当文件不是这个编码的时候更容易出现解码失败的编码方式放在前面, 把宽松的编码方式放在后面。


例如, latin1 是一种非常宽松的编码方式, 任何一种编码方式得到的文本, 用 latin1 进行解码, 都不会发生解码失败 —— 当然, 解码得到的结果自然也就是理所当然的乱码。 因此, 如果你把 latin1 放到了 fileencodings 的第一位的话, 打开任何中文文件都是乱码也就是理所当然的了。


以下是推荐的一个 fileencodings 设置:


set fileencodings=ucs-bom,utf-8,cp936,gb18030,big5,euc-jp,euc-kr,latin1


其中, ucs-bom 是一种非常严格的编码, 非该编码的文件几乎没有可能被误判为 ucs-bom, 因此放在第一位。


utf-8 也相当严格, 除了很短的文件外 (例如许多人津津乐道的 GBK 编码的联通被误判为 UTF-8 编码的经典错误), 现实生活中一般文件是几乎不可能被误判的, 因此放在第二位。


接下来是 cp936 和 gb18030, 这两种编码相对宽松, 如果放前面的话, 会出现大量误判, 所以就让它们靠后一些。 cp936 的编码空间比 gb18030 小, 所以把 cp936 放在 gb18030 前面。


至于 big5euc-jp 和 euc-kr, 它们的严格程度和 cp936 差不多, 把它们放在后面, 在编辑这些编码的文件的时候必然出现大量误判, 但这是 Vim 内置编码探测机制没有办法解决的事。 由于中国用户很少有机会编辑这些编码的文件, 因此我们还是决定把 cp936 和 gb18030 前提以保证这些编码的识别。


最后就是 latin1 了。 它是一种极其宽松的编码, 以至于我们不得不把它放在最后一位。 不过可惜的是, 当你碰到一个真的 latin1 编码的文件时, 绝大部分情况下, 它没有机会 fall-back 到 latin1, 往往在前面的编码中就被误判了。 不过, 正如前面所说的, 中国用户没有太多机会接触这样的文件。


如果编码被误判了, 解码后的结果就无法被人类识别, 于是我们就说, 这个文件乱码了。 此时, 如果你知道这个文件的正确编码的话, 可以在打开文件的时候使用 ++enc=encoding 的方式来打开文件, 如:


:e ++enc=utf-8 myfile.txt


5 fencview


根据前面的介绍, 我们知道, 通过 Vim 内置的编码识别机制, 识别率是很低的, 尤其是对于简体中文 (GBK/GB18030)、 繁体中文 (Big5)、 日文 (euc-jp) 和韩文 (euc-kr) 之间的识别。 而对于普通用户而言, 肉眼看出一个文件的编码方式也是很不现实的事情。 因此,强烈推荐水木社区的 mbbill 开发的 fencview 插件。 该插件使用词频统计的方式识别编码, 正确率非常高。


Vim tips: Using tabs

1:22:00 PM 0 Comments

Before Vim 7.0 was released last May, I usually had six or seven xterms or Konsole windows open, each with a single Vim session in which I was editing a single file. This takes up a lot of screen space, and isn't very efficient. With Vim 7.0, users now have the option of using tabs within Vim. With Vim's tab features you can consolidate all your sessions into one window and move between files more easily.

If you're using an version of Vim older than 7.0, you won't have access to this feature. By now, though, most distros have moved to Vim 7.0, so if you're using a recent release you should be OK.

Opening a tab

Let's start by opening a new tab in Vim. There are a few ways to do this. Probably the easiest to remember is to run the :tabnew command while in normal mode. This will open a new tab with an empty buffer. If you want to edit a file in the new tab, you can run :tabnew filename and Vim will load the file in the new tab.

Another way to do this is to open more than one file at startup using the -p option. If you want to open three files in separate tabs, you'd use this syntax:

vim -p file1 file2 file3

This will start a Vim session with file1 in the first tab, file2 in the second tab, and file3 in the third.

Vim will open up as many tabs as you like on startup, up to the maximum number of tabs set in the .vimrc file. The default maximum is 10 tabs, but you can change this by setting the tabpagemax option in your .vimrc, like so:

set tabpagemax=15

If you exceed the number of tabs allowed by tabpagemax Vim will simply open the maximum number of tabs, and the other files will be open but not displayed. You can edit the remaining files by using the :next or :last command to move to the files that are not displayed in a tab. Note that this setting only applies to the maximum number of tabs Vim will open on startup -- you can still open more tabs during your Vim session.

The :tabf command allows you to search for a file in your current path and open it in a new tab. For instance, if you want to open a file called inventory.txt that's in your current path, you could run:

:tabf inven*

That will search for a file that matches the string inven and any number of characters after it. If only one file is found, Vim will open it in a new tab. If you have several files that match, Vim will complain that too many files match, and you'll have to narrow the search a little. The :tabn command will do autocompletion of file names in your path, so you can just type the first few characters of a filename and hit Tab to find the right file.

Figure 1
Figure 1

Moving between tabs

You can switch between tabs using :tabn and :tabp, or you can use gt while you're in normal mode. Of course, if you're using Vim's GUI, GVim, you can also use the mouse to switch between tabs or use keyboard shortcuts. In GVim, you can also access a context menu for tabs by right-clicking on the tab bar. Here you can open new tabs with a new buffer or an existing file, or close the current tab.

If you have a lot of tabs open, you can use :tabfirst, or just :tabfir, to jump to the first tab, and :tablast to jump to the last tab that's open.

By default, the tab labels are shown at the top of the Vim window only when tabs are open. If you want to see the tab bar all the time, you can modify the showtabline option in your .vimrc. To set this to display all of the time, use:

set showtabline=2

If you want to turn it off altogether, use 0 instead of 2.

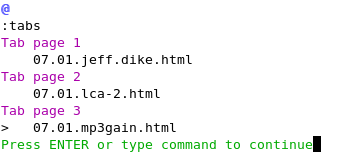
Note that the tabs are still there, even if the tab bar isn't displayed. If you have the tabline option set to 0, you can still see what tabs are open by using the :tabs command, which will provide a summary of open tabs, as you can see in the figure.

Speaking of setting options, if you don't like the existing shortcuts for the tab commands, you can add your own. For instance, if you want to make it easy to open a new tab, you might insert this into your .vimrc:

imap ,t <Esc>:tabnew<CR>

This tells Vim to set up a keymap for ,t in insert mode, to run Esc to put Vim into normal mode, then :tabnew and a carriage return to run the command. You can set up mappings for all of the tab commands that you use regularly. For more on setting up mappings, see our article Using Vim mappings and abbreviations.

Rearranging tabs

If you're really meticulous and want to position tabs just so in Vim, you can move the tabs to a specific spot in the tab order using :tabm n , where n is the position number that you want to use. If you don't give the :tabm command an argument, then the current tab will be moved to the last spot.

Vim starts tab numbering from 0, so if you have six tabs open, you'll have tab 0 through tab 5. So, if you're in the first tab and want to move it to the fourth position, you'd run :tab 3.

Note that you can still use viewports normally within tabbed windows, and tabs are useful for doing a quick edit in a file when you have a main Vim window set up with a couple of viewports arranged just right.

Running commands in tabs

Let's say you're editing six or seven files in Vim and realize that you need to replace a variable name with a new one. Using the :tabdo command, you can run a search and replace through all of the tabs at once rather than changing each file individually. For instance, if you want to replace foo with bar, you'd run this:

:tabdo %s/foo/bar/g

That will run through each open tab and run the search and replace command (%s/foo/bar/g) in each one.

Tabs can be extremely useful, and it only takes a short while to become proficient with them. For more on working with tabs in Vim, run :help tab-page-intro within Vim.

Fwd: 使用Busybox做一个小巧的Linux操作系统

3:51:00 PM 0 Comments


1.基础知识

一个操作系统可以简单的抽象为,引导程序 内核 文件系统。


vmlinuz是Linux 内核的镜像文件,可以被引导程序加载,从而启动Linux系统。


initrd的全称是boot loader initialized RAM disk,它是系统启动时所使用的根文件系统映像文件,这个文件系统中包含几个驱动模块,用来装载实际的根文件系统,比如一个IDE或SCSI硬盘的驱动模块,内核装入这个模块之后用它来驱动硬盘,挂接硬盘到ramdisk的某个子目录,然后再用其中的pivot_root命令,将硬盘文件系统变成根文件系统,并开始执行init进程,此时init ram disk被umount,寿终正寝。


由此可见,我们可以用vmlinuz initrd.img做一个文件系同长驻内存的迷你Linux。


现在进入正题了:


2.编译内核

cd /usr/src/....----进入内核源代码目录,没有的话去官方网站,随便下

make menuconfig-----配置编译选项请注意一定加入RAM disk support 和initial RAM disk

(initrd) support 的支持(在block device中)。另外最好将ext3文件系统编入内核,不要编成模块。配置完毕后保存为.config(默认)

make bzImage----编译


在许多内核编译参考中还有

make modules

make modules_install两步

但我们这里没有加入对modules的支持,所以不需要。生成的bzImage文件在usr/src/linux/arch/.../boot中,省略的根据你的机器架构决定,make过程中会有提示,比如我的是x86_64. 注意这个文件非常重要,其实就是我们最终的vmlinuz.


3.busybox

busybox是一个集成了一百多个最常用linux命令和工具的软件,它甚至还集成了一个http服务器和一个telnet服务器,而所有这一切功能却只有区区1M左右的大小.我们平时用的那些linux命令就好比是分力式的电子元件,而busybox就好比是一个集成电路,把常用的工具和命令集成压缩在一个可执行文件里,功能基本不变,而大小却小很多倍,在嵌入式linux应用中,busybox有非常广的应用,另外,大多数linux发行版的安装程序中都有busybox的身影,安装linux的时候案ctrl alt F2就能得到一个控制台,而这个控制台中的所有命令都是指向busybox的链接.在我们的迷你Linux中,需要的也正是busybox的命令和工具。


下载 http://busybox.net/downloads/

使用过程中许多高版本都出现编译错误,所以用了一个最原始的版本busybox-1.00

#cp busybox-1.00.tar.gz /tmp/bunny

#cd /tmp/bunny

#tar xvfz busybox-1.00.tar.gz

#cd busybox-1.00

#make menuconfig ----编译配置


下面是需要编译进busybox的功能选项,其他的可以根据需要自选.

General Configuration应该选的选项

Show verbose applet usage messages

Runtime SUID/SGID configuration via /etc/busybox.conf

Build Options

Build BusyBox as a static binary (no shared libs)


这个选项是一定要选择的,这样才能把busybox编译成静态链接的可执行文件,运行时才独立于其他函数库.否则必需要其他库文件才能运行,在单一个linux内核不能使他正常工作.


Installation Options

Don't use /usr


这个选项也一定要选,否则make install 后busybox将安装在原系统的/usr下,这将覆盖掉系统原有的命令.选择这个选项后,make install后会在busybox目录下生成一个叫_install的目录,里面有busybox和指向它的链接.


其他选项都是一些linux基本命令选项,自己需要哪些命令就编译进去,一般用默认的就可以了.

配置好后退出并保存.config.

make

make install

编译好后在busybox目录下生成子目录_install,里面的内容:

bin

linuxrc -> bin/busybox

sbin

其中可执行文件busybox在bin目录下,其他的都是指向他的符号链接.


4.制作自己的root fs

1)目录结构

mkdir /tmp/myOS/rootfs

cd /tmp/myOS/rootfs

mkdir etc usr var tmp proc home root dev

其中etc,proc和dev是一定要建的,bin和sbin不用建,因为busybox中已经有了.

其他的可以象征性的建几个就可以了.

拷贝busybox

#cp -R /tmp/bunny/busybox-1.00/_install/* /tmp/myOS/rootfs/


2)设备文件

我是直接从FC系统/dev目录里cp的,方法如下:

#cp -R /dev/console /tmp/myOS/rootfs/dev/

#cp -R /dev/null /tmp/myOS/rootfs/dev/

#cp -R /dev/zero /tmp/myOS/rootfs/dev/

你认为需要的都cp过来

有的参考文献说fd0,hda,ram,ram1,tty1,loop1,fb0,fb,tty等是必备的,但是好像有些文件并没有


3)建立etc目录下的配置文件

我是直接拷贝busybox自带的例子

cp -R tmp/bunny/busybox-1.00/examples/bootfloppy/etc/* /tmp/myOS/rootfs/etc


4)制作initrd.img映象文件

cd /tmp/myOS/

dd if=/dev/zero of=/tmp/disk bs=1M count=32 ------初始化32M内存空间

mkfs.ext3 -m0 /tmp/disk ------格式化为ext3

mkdir /mnt/ram

mount -o loop /tmp/disk /mnt/ram ------挂载到/mnt/ram

cp -R rootfs/* /mnt/ram ------把rootfs写入内存

umount /mnt/ram

dd if=/tmp/disk of=/tmp/myOS/initrd.img ------把内存中的内容以映象方式取出

ok,这个initrd.img就是我们的rootfs

有的文献使用ram0,也就是将上述过程的/tmp/disk改为/dev/ram0,虽然制作过程没有问题,但是它存在大小限制


5.整合,启动

1)kernel

cp /usr/src/linux/arch/x86_64/bzImage /boot/vmlinuz

2)rootfs 一般命名为initrd.img

cp /tmp/myOS/initrd.img /boot

3)有了上述两个文件,已经可以通过网络dhcp, tftp服务器启动,tftp服务器中添加启动脚本如下

DEFAULT linux

PROMPT 0

LABEL linux

KERNEL vmlinuz

append initrd=initrd.img devfs=nomount ramdisk_size=52000


问题:理论上这个小Linux也应该可以从grub引导。